Getting Started
Learning-oriented — the onboarding on-ramp every other guide assumes.
This walkthrough takes you from a fresh AutoCAD session to your first dimensioned tilt-up panel and a printed sheet. It is written for a detailer who has AutoCAD but has never used ConstructiVision. Work through the steps in order; each builds on the last.
Before you start
A supported AutoCAD installation (AutoCAD 2025 or newer) with ConstructiVision available.
Basic AutoCAD familiarity: opening a drawing and running a menu command.
A project location on disk where ConstructiVision may create a project folder.
Optional but recommended: a SimpleStruct account — new accounts start a 7-day free trial with 10 tokens (see Membership & Tokens).
Step 1 — Install and load ConstructiVision
Unzip the download, double-click Install.cmd, then start AutoCAD. Confirm the CV menu appears in the menu bar and the ConstructiVision toolbar is visible — they load automatically, nothing to type.
The first time AutoCAD starts, it may ask about ConstructiVision’s program files (“Unsigned Executable File”) — choose Always Load.
If the toolbar is missing, choose CV → Show CV Toolbar. If the whole menu is missing, see Troubleshooting → “After installing, there is no ConstructiVision menu or toolbar in AutoCAD.”
Every drawing and printing command in this guide is on both the CV menu and the toolbar — see the full Command & Toolbar Reference for what each button does.
Step 2 — Sign in to your account
Signing in links this workstation to your SimpleStruct account and token balance, and is what lets a drawing carry its permanent print license. You don’t type anything:
On first start, a dialog asks “Link this workstation to your SimpleStruct account?” — click Yes. Your browser opens the sign-in page; sign in there and the workstation links automatically. (Signed in to AutoCAD with an Autodesk account that SimpleStruct already knows? ConstructiVision skips the question and links the workstation hands-free.)
Chose No? The command line confirms you can do it later — sign in any time from CV → Sign In (Link Workstation). The full walkthrough, including what pairing unlocks, is Pair your workstation.
An unlinked seat still draws and saves normally — details in Membership & Tokens.
Step 2a — Staying up to date
ConstructiVision checks for a newer version each time it loads. When one is available it asks whether to update — click Yes and it downloads and finishes installing the next time you close AutoCAD. When you’re current it just notes “ConstructiVision is up to date.” on the command line. Nothing to do manually.
Step 3 — Create a project
A project is the container for one building’s panels. Create it first — every panel belongs to a project.
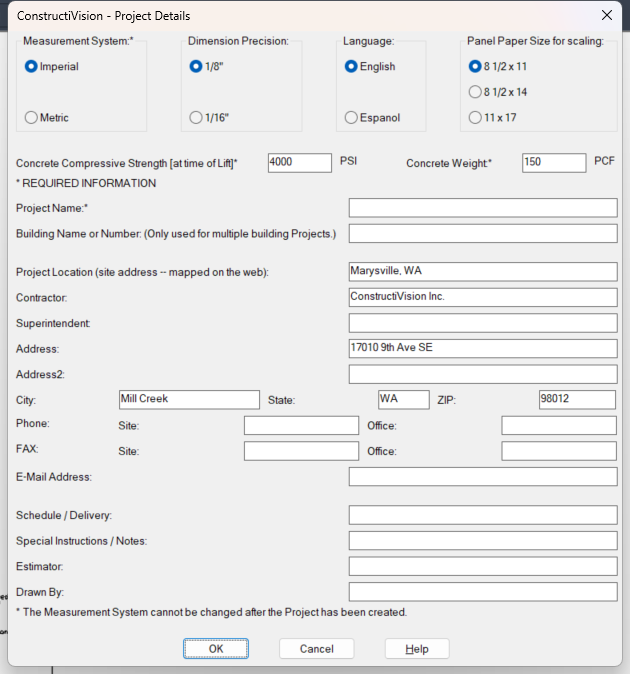
The Project Details form — the first dialog of a new project.
Click New Project (toolbar or CV menu).
In Project Details, enter the project name and complete the details: measurement system (Imperial or Metric), concrete specification, and contractor / job information. These become the defaults for every panel in the project.
Confirm. The New Project dialog opens next — your project name carries over, and the folder path underneath follows it automatically. Keep the suggested location or click Browse… to put the project folder somewhere else, then confirm with OK. ConstructiVision creates the folder on disk and starts the project data file (
<project name>.cvp) that it maintains automatically as you work — that one file is your project’s portable record and moves cleanly between ConstructiVision products.A small dialog asks “What kind of drawing is this?” — click Panel.
Tip
The values you set in Project Details (units, concrete spec) carry into every panel, so getting them right here saves re-entry later. You can change them later with the Project Details button, and rename or move the project with Change Project Folder Location — see Move or rename a project.
Step 4 — Draw your first panel
Choosing Panel opens Main Panel Details — the hub form for the panel.
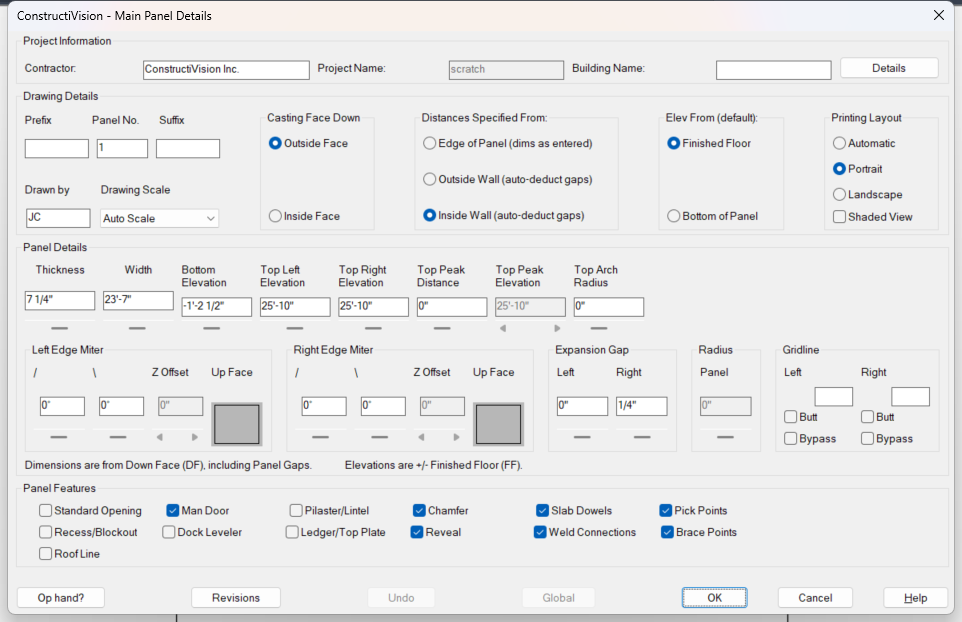
The Main Panel Details dialog — the panel’s home form.
Set the master panel dimensions: width, height, and thickness. This is the blank concrete panel every feature is added onto.
Give the panel its mark (panel number). You can add a free-text prefix / suffix (e.g. TP08-12) that carries into dimensions, sheets, and file names.
Optionally add gridline marks — a label on either side draws that gridline with its bubble.
Confirm. ConstructiVision draws the dimensioned panel outline.
At this point you have a correct, dimensioned rectangular panel. The next step adds a feature to it.
Step 5 — Add your first feature (an opening)
Features — openings, blockouts, chamfers, hardware — each have a dialog. You can reach them two ways: from the feature checklist in Main Panel Details, or directly from their toolbar buttons (Standard Opening, Man Door, Recess / Blockout, …). Add one opening so you have seen the dialog → confirm → redraw loop that every feature follows.
Click Standard Opening.
Add an opening and set its elevation, height, width, and its distance across the panel. Values are clamped to the panel’s edges, so an opening cannot fall outside the panel.
Elevations can be entered from Finished Floor or Bottom of Panel — the Elev From toggle in the dialog switches the lens; the stored data does not change.
Confirm. The panel redraws with the opening cut and dimensioned.
If a feature you enabled did not draw
See Troubleshooting → “I enabled a feature (weld connection, opening, recess…) but it did not appear on the panel.”
You now know the core loop: open the feature dialog → set the values → confirm → the panel redraws. Every feature in How-To Guides works this way.
Step 6 — Print your panel
Produce a sheet to complete the round trip from data to deliverable.
Click Print All Layers (or Print Setup to plot the drawing as displayed).
In the plot dialog, pick your printer — or DWG To PDF.pc3 to issue a PDF — and the paper size, then confirm.
For per-trade sheets (edge form, weld connections, pick/brace points, …) and site layouts, see Plot and print drawings. To batch-print every panel in the project as a panel book, see Print a panel book.
Where to go next
Take the guided in-product tour: click Tutorial on the toolbar — it builds a small building with you, step by step.
Learn each feature → Tutorials — thirteen core lessons plus an advanced track, with in-product grading and downloadable starter and solution drawings.
Look up a specific task → How-To Guides
Keep the cheat sheet open while you work → Quick Reference
What every button and typed command does (icon, command, description) → Command & Toolbar Reference
Your team’s cloud projects, analytics, and learning progress in the browser → Using cv-web
Pricing, tokens, and what your subscription includes → Membership & Tokens
Hit a problem → Troubleshooting
Understand a term or an industry rule → Reference & Knowledge Base