Tutorial 13: Materials List & the Panel Book
Turn the finished panel into deliverables: count its materials into a spreadsheet-ready take-off, print a sheet, and run the project’s panel book in one batch pass.
The panel lessons took TP08-12 from a blank rectangle to a brace-ready panel; this closing lesson produces what actually leaves the office. The materials list is the quantity take-off ConstructiVision counts from the drawn panel — embeds, bracing hardware, area, and concrete volume — written as a file a spreadsheet opens directly. The panel book is the printed drawing set for the project’s panels, batch-printed from one dialog. Both are guided first passes here; the full field notes live in Generate a materials list, Plot and print drawings, and Print a panel book.
Note
A browser version covers part of this lesson. Open it here — it lists exactly which steps it does not cover, so you know what to come back to AutoCAD for.
Watch this lesson
Transcript (19 captions)
0:01 — Tutorial 13 — Materials List & the Panel Book. TP08-12 as Lesson 9 finished it: every feature the curriculum placed, brace-ready. This closing lesson turns the panel into what actually leaves the office — a spreadsheet-ready quantity take-off, a printed sheet, and the project's panel book.
0:16 — The count is taken from the DRAWN panel, not from the dialog settings — draw first, count second.
0:22 — Step 1 — one redraw. Edit Main Panel opens Main Panel Details with everything the lessons entered.
0:25 — Change nothing. The redraw makes sure the drawing and its computed engineering values — the area and volume the list reports — are current.
0:33 — OK — the panel redraws, exactly as it has at the end of every lesson.
0:45 — Current geometry, current numbers. On a panel that was configured but never drawn, the Materials List stops and says so — it never counts stale geometry.
0:49 — Step 2 — CV → Print → Materials List. A small progress dialog steps through the collating counts. It is display-only: no buttons, nothing to enter — it runs and closes on its own.
1:00 — Materials List — the panel's embeds, brace points, area, and concrete volume, counted from the drawing.
1:01 — The command line reports the count: how many material types were found — and it names the lineal-footage form items still pending on a single-panel drawing, chamfer, reveal, and edge form, explicitly rather than guessing a quantity.
1:14 — Back to the drawing.
1:16 — Step 3 — the take-off itself: matlist.csv, written next to the panel drawing in the project folder. It opens directly in any spreadsheet; the header row is Category, Material, Quantity, Unit.
1:26 — The rows are your lessons, counted: the pair of A plates and the five EM6 joist embeds from Lesson 7 under Weld Connections — by full catalog name — the Lesson 9 brace pair under Brace Points, and the panel's net Area and Cubic Yards with the openings already deducted. Change the panel, redraw, run it again — the list is rebuilt from scratch every time.
1:48 — Step 4 — print one sheet. CV → Print → Panel → All Layers: the drawing is saved, every layer switches on, and the Plotter Selection dialog opens — every ConstructiVision print route ends here.
1:50 — Four choices: a Plot Device — DWG To PDF makes the lesson paperless — a Paper Size, where ANSI A matches the scale from Tutorial 1, a Plot Style such as acad.ctb, and the orientation. OK unlocks once Plot Device and Plot Style each name a real choice — it stays greyed while either reads None.
2:09 — The other five entries on the Print → Panel menu are the per-trade layer presets — Edge Form, Ledgers/Top Plate, Weld Connections, Feature Strip, Pick/Brace Points — same dialog, trade-filtered sheet.
2:19 — Cancel for now — your own printer decides the real sheet. With a device chosen, OK plots the panel scaled and centered: your first issued sheet of the curriculum.
2:38 — Step 5 — the panel book: CV → Batch Utilities. The Select Panels list shows every panel drawing in the project folder; Select All covers the set. Leave Print All Layers checked and click OK — each panel is opened, brought up to date with a redraw, and printed through the same Plotter Selection dialog with your choices already selected.
2:58 — One honest note: in this release the batch runs that one pass — update, then print. The Print Materials List batch operation that would tally one combined take-off is being reconnected; the per-panel matlist.csv files are the accurate source, and they combine cleanly in a spreadsheet.
3:13 — This lesson's results live outside the drawing, so there is no CV-CHECK-LESSON13 — check the outputs themselves: matlist.csv beside the drawing with the lessons' counts, and one sheet per panel through the same dialog. That completes the curriculum: one panel built feature by feature, the site laid out around it, and the deliverables out the door.
Tip
The written steps below are the authoritative version — they are kept current continuously, while videos are re-recorded in batches. Companion video versions lists which build each video was recorded against.
What you will build
From the finished panel TP08-12 and the Riverside Distribution Center project:
matlist.csv— the panel’s take-off, written next to the panel drawing: the weld embeds from Lesson 7 by their catalog names, the brace points from Lesson 9, and the panel’s net area and concrete volume with the openings already deducted;one printed panel sheet — to paper or PDF — through the Plotter Selection dialog every ConstructiVision print route uses;
the project’s panel book — the selected panels updated and printed in one Batch Utilities run.
Before you start
Complete Tutorial 9: Brace Points & Expansion Gaps — this lesson returns to panel TP08-12 where the panel lessons (1–9) left it. The site trilogy (Tutorials 10–12) is not required: open the panel drawing itself, not the
riverside sitedrawing.Have TP08-12 open — click Open Drawing and pick it from the project folder, or continue in the session where you finished Lesson 9.
A print device for Steps 4–5: any printer works, and a PDF device such as DWG To PDF.pc3 (included with AutoCAD) makes this lesson paperless.
Tip
Joining here? Download the lesson solution — the finished TP08-12 this lesson starts from — and
place it in the project folder you created in Tutorial 1 before opening it. The materials list
resolves embed names through the project’s component catalog, and Batch Utilities works on the
project’s panel folder, so this lesson wants the drawing inside its project — not opened from a
downloads folder.
Lesson
Step 1 — Redraw the panel
The count is taken from the drawn panel, not from the dialog settings — draw first, count second. One redraw makes sure the drawing and its computed engineering values (the area and volume the list reports) are current:
Click Edit Main Panel. Main Panel Details opens with everything the lessons entered.
Change nothing — click OK. The panel redraws, exactly as it has at the end of every lesson.
Note
Run on a panel that was configured but never drawn, the Materials List stops and says so — “This panel is configured but has not been drawn yet. Run Draw Panel first…” — and a blank template gets its own distinct message. It never counts stale geometry and never mistakes an empty panel for lost data.
Step 2 — Generate the materials list
From the menu choose CV → Print → Materials List. (The same command is the Materials List toolbar button, and the Print Materials List button on the Program Options hub.)
A small progress dialog — Processing Materials List — steps through the collating counts. It is display-only: no buttons, nothing to enter; it runs and closes on its own.
Watch the command line: it reports how many material types were counted, and lists the lineal-footage form items (chamfer strip, reveal strip, edge form) that are not yet totaled on a single-panel drawing — named explicitly rather than guessed at. See the notes in Generate a materials list for exactly what is counted today.
Step 3 — Open the take-off
Open matlist.csv — it is written next to the panel drawing, in the project folder, and opens
directly in Excel or any spreadsheet. The header row is Category,Material,Quantity,Unit, and the
rows are your lessons, counted:
Weld Connections — the pair of A plates and the five EM6 joist embeds from Lesson 7, each resolved to its full name from the project’s component catalog — the same names the Weld Connections dialog shows.
Brace Points — the pair of brace inserts from Lesson 9.
Panel Specifications — the panel’s net Area and its concrete volume in Cubic Yards, with the door and window openings already deducted.
Note
No Fasteners row appears for TP08-12, and that is correct: the Lesson 8 anchor bolts belong to wood bars — the ledger and the on-edge top plate — whose bolt arrays draw as tick marks on the bar, with the bolt spec on the call-out. The take-off’s per-piece J Bolt row counts panels that keep their cast-in bolts as discrete hardware pieces; see Generate a materials list.
Because the quantities come from the drawing, the list is rebuilt from scratch on every run — change the panel, redraw, and run Materials List again and the file simply reflects the new state.
Step 4 — Print one sheet
Now the drawing side, single panel first:
Choose CV → Print → Panel → All Layers — the everything-on panel sheet. (The other five entries on that menu are the per-trade layer presets — Edge Form, Ledgers/Top Plate, Weld Connections, Feature Strip, Pick/Brace Points — covered in Plot and print drawings.)
The drawing is saved, the layers are set, and the Plotter Selection dialog opens:
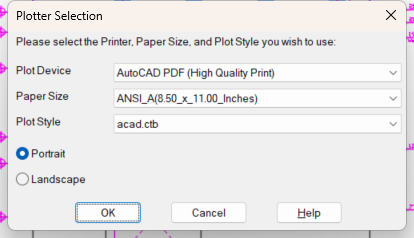
The Plotter Selection dialog — every ConstructiVision print route ends here.
Pick a Plot Device (choose DWG To PDF.pc3 for a PDF), a Paper Size (ANSI A matches the paper size the project was scaled for in Tutorial 1), a Plot Style such as
acad.ctb, and the orientation. OK stays greyed while either Plot Device or Plot Style still reads None — pick a real one for each.Click OK. TP08-12 plots scaled and centered — your first issued sheet of the curriculum.
Step 5 — Print the panel book
Choose CV → Batch Utilities.
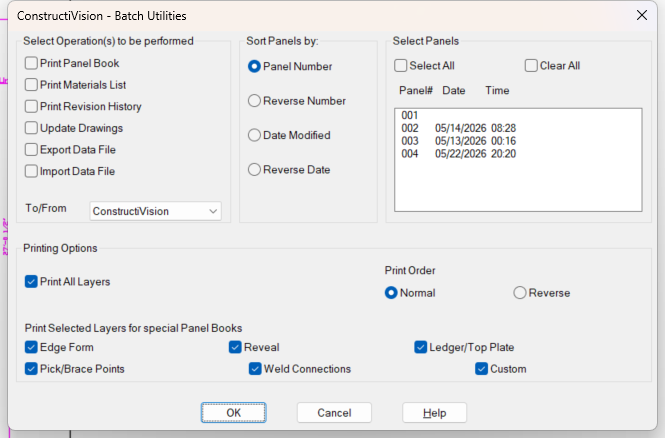
The Batch Utilities dialog — the project’s panel list on the right, printing options below.
The Select Panels list shows every panel drawing in the project folder, sortable by panel number or date. Click Select All — a panel book covers the set. (No selection at all also means all panels.)
In Printing Options, leave Print All Layers checked — the complete sheet per panel. The layer toggles below it build the special per-trade panel books, and Print Order reverses the sequence when your printer stacks face-up.
Click OK. The batch takes each selected panel in turn: the panel is opened, brought up to date with a redraw, and the Plotter Selection dialog opens for it with your Step 4 choices already selected — confirm OK and the batch moves to the next panel. Let it finish before starting another batch operation.
Note
In this release the batch runs that one pass — update, then print — across the selection,
whichever operation boxes are checked. The Print Materials List batch operation that would
tally one combined take-off across panels is being reconnected and is not yet functional; the
per-panel matlist.csv files from Step 2 are the accurate source, and they combine cleanly in a
spreadsheet. See Generate a materials list.
Check your result
Tip
This closing lesson’s results live outside the drawing — a data file and printed sheets — so
there is no CV-CHECK-LESSON13 command to grade it. Check the outputs themselves against the
list below.
You should now be able to verify all of the following:
matlist.csvsits next to the TP08-12 drawing and opens in a spreadsheet, header rowCategory,Material,Quantity,Unit.The take-off counts what the lessons placed: 2 of the A plate and 5 of the EM6 embed under Weld Connections — by full catalog name, not code — the Lesson 9 brace-point pair under Brace Points, and Area / Cubic Yards under Panel Specifications.
The command line named the lineal-footage items still pending instead of printing a guessed quantity for them.
The Step 4 sheet (paper or PDF) shows the complete panel, scaled and centered, with the title block carrying the project details from Tutorial 1.
Step 5 produced one sheet per selected panel — the panel book — each printed through the same Plotter Selection dialog.
If a count is off, the fix is always upstream: correct the feature in its dialog, confirm so the panel redraws, and run Materials List again — the take-off follows the drawing.
Where next
That completes the curriculum: one panel built feature by feature, the site laid out around it, and the deliverables — take-off and panel book — out the door.
Reference depth: Generate a materials list (what is counted and the output format), Plot and print drawings (every print route and preset), and Print a panel book (Batch Utilities in full).
Hand the panel to the engineer: Export lift-engineering data — the data export that accompanies a real lift design.
What printing costs: Membership & Tokens — when plots consume a token and when they are free.