Tutorial 4: Chamfer
Break every exposed edge of the panel with a cast-in bevel — set it once, and ConstructiVision cuts, notes, and counts it automatically.
A chamfer is a beveled edge cast into the concrete so exposed corners are broken rather than left sharp. In ConstructiVision it is a panel-wide setting, not something you draw edge by edge: one dialog covers the panel perimeter and every opening type, and the bevel is cut and called out each time the panel redraws.
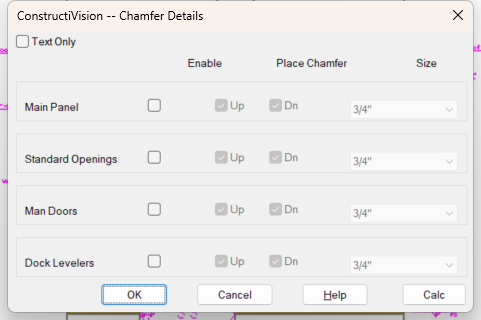
The Chamfer Details dialog — one row per group of edges.
Note
This lesson is AutoCAD-only. ConstructiVision on the web has no equivalent today — the browser page for this lesson explains why, so you are not left hunting for a feature that is not there.
Watch this lesson
Transcript (19 captions)
0:01 — Tutorial 4 — Chamfer. A 3/4" bevel cast into every exposed edge of TP08-12 — set once, and it is cut, called out, and counted on every redraw.
0:10 — Click Chamfer on the toolbar — or check Chamfer in Main Panel Details. Either route opens the same Chamfer Details dialog.
0:12 — Four rows, one per group of edges: Main Panel, Standard Openings, Man Doors, Dock Levelers. Each row carries the same three settings — Enable, the Up / Dn face boxes, and a Size list.
0:23 — Enable the Main Panel row — Up, Dn, and Size light up.
0:25 — Up — the panel face toward you, the face up in the casting bed.
0:26 — Dn — the far face, against the bed. Both checked bevels both faces' edges — the usual call-out when both sides stay exposed.
0:28 — Open the Size list —
0:29 — — and pick 3/4". The choices are 1/2", 3/4", and 1", and each row can use a different size.
0:36 — Pre-set Standard Openings: Enable —
0:38 — — Up and Dn again —
0:40 — The Size list already reads 3/4".
0:42 — — and 3/4". No openings exist yet; this row waits for Lesson 6's windows to arrive already chamfered.
0:48 — And Man Doors — Lesson 5's 3070 door will come out of its dialog with beveled edges and a call-out inside the opening.
0:52 — The Size list already reads 3/4".
0:54 — Dock Levelers stays unchecked — nothing on this panel needs it.
0:58 — OK — the Chamfer feature switches on automatically, and the panel redraws with the 3/4" bevel along both faces of the perimeter.
1:10 — The perimeter edges beveled at 3/4" on both faces — and no chamfer text note, because the cut itself is shown.
1:26 — Text Only, at the top, is the fallback: no bevel is cut, and a margin note — 3/4" Chamfer Up & Down on: Panel Edges Openings Doors — tells the field crew what to form. Try it and put it back; every redraw rebuilds from stored data, so nothing lingers.
1:43 — Review your work: type CV-CHECK-LESSON4 at the command line — it prints this lesson's expected settings as a review checklist. Reopen Chamfer Details and compare each row against it.
Tip
The written steps below are the authoritative version — they are kept current continuously, while videos are re-recorded in batches. Companion video versions lists which build each video was recorded against.
Recorded in the earlier lesson order
This video was recorded before the course moved to build order (2026-10-09). In it the panel has no openings yet, so the Standard Openings and Man Doors rows are set for later lessons. In build order the windows and the door already exist, so those rows chamfer them as soon as you click OK.
What you will build
You continue with panel TP08-12 — the gable-end panel, 23’-7” tall at the eaves, with the two windows from Tutorial 6 and the man door from Tutorial 5. In this lesson you put a 3/4” chamfer on both faces of the panel’s perimeter edges, and the same chamfer on the edges of the standard openings and the man door. When you finish, the panel redraws with its edges and openings beveled, and the Chamfer toggle in Main Panel Details is checked.
Before you start
Complete Tutorial 5: Door — this lesson picks up the project and panel TP08-12 where that lesson left them.
Have panel TP08-12 open. Any panel works — the values below are what make the result checkable.
Lesson
Open Chamfer Details. Click Chamfer on the toolbar, or check Chamfer in the Main Panel Details feature checklist you toured in Lesson 2 — either route opens the same Chamfer Details dialog.
Read the four rows. Each row is an independent group of edges: Main Panel (the panel perimeter), Standard Openings, Man Doors, and Dock Levelers. A row that is not enabled has its controls greyed out. Each row carries the same three settings: Enable, the Up / Dn face boxes, and a Size list.
Enable the Main Panel row. Check Enable on Main Panel — the row’s Up, Dn, and Size controls light up.
Choose the faces. Check both Up and Dn. Up is the panel face toward you in the drawing — the face that is up in the casting bed — and Dn is the far face, against the bed. Checking both chamfers the edges of both faces, the usual call-out for a panel whose edges are exposed on both sides.
Pick the size. Open the Size list on the Main Panel row and choose 3/4”. The choices are 1/2”, 3/4”, and 1”, and each row can use a different size.
Chamfer the openings. Check Enable on Standard Openings and on Man Doors, and give each row Up, Dn, and 3/4” as well. These rows chamfer the openings already on the panel — the two windows from Tutorial 6: Standard Opening and the man door from Tutorial 5: Door — and any opening you add later arrives chamfered too, with a call-out placed inside each opening. Leave Dock Levelers unchecked.
Confirm. Click OK. The Chamfer feature switches on automatically — no separate toggle to remember — and the panel redraws with the 3/4” bevel cut along both faces of the perimeter and around the door and both windows.
Try Text Only. Reopen Chamfer Details and check Text Only at the top of the dialog. The Up / Dn boxes grey out — in this mode the bevel geometry is not cut; the drawing calls the chamfer out in text instead. Click OK and the panel redraws with a note in the margin below the panel reading:
3/4” Chamfer Up & Down on: Panel Edges Openings Doors
Use this mode if chamfering a very complex panel is slow or fails — the sheet still tells the field crew exactly what to form. For TP08-12 we want the real cut, so reopen the dialog, uncheck Text Only, and click OK. The panel redraws with the bevel restored — every redraw rebuilds the panel from its stored data, so nothing from the text-only pass lingers.
Check your result
Tip
Check your work automatically. Type CV-CHECK-LESSON4 at the command line —
ConstructiVision prints this lesson’s expected settings as a review checklist. Chamfer
settings live in the Chamfer Details dialog, so reopen it and compare each row against the
checklist rather than expecting a pass/fail grade.
The drawing and dialogs should now show, matching your entries exactly:
The panel perimeter edges beveled at 3/4” on both faces — and no chamfer text note, since the cut itself is shown.
The edges of the two windows and the man door beveled at 3/4” on both faces, with a chamfer call-out inside each opening.
Main Panel Details (open Edit Main Panel) with the Chamfer toggle checked in the feature checklist.
Chamfer Details, reopened, holding everything you entered: Main Panel, Standard Openings, and Man Doors enabled, each Up + Dn at 3/4”, Dock Levelers off, Text Only clear.
Chamfer is not yet counted in the take-off
Earlier drafts of this lesson told you to check the Materials List for a 3/4” chamfer strip. It will not be there. The Materials List reports this line as pending — it prints “phase-2 pending … reveal/chamfer lineal, Edge Form, Treated lumber, Extensions” — so chamfer lineal footage is not in the take-off today. Corrected 2026-07-31 after checking rather than assuming.
The chamfer itself is still applied and drawn; it is the quantity reporting that is outstanding. Until it lands, take chamfer footage off the drawing or off the panel schedule, not off the Materials List.
If something is off, reopen Chamfer Details, correct the row, and confirm — the panel redraws from the corrected values, the same dialog → confirm → redraw loop as every lesson so far.
Where next
Next lesson: Tutorial 7: Weld Connections — add weld-plate connections to the panel.
Reference depth: Add chamfers and reveals — the full field-by-field Chamfer Details table, plus reveals (rustication strips), the other cast-in edge treatment.