Tutorial 21: Auto Drawing Update
Change something that touches more than one panel, then bring the whole set current at once — the Batch Utilities hub re-runs the draw across every panel you select, so no affected sheet is left showing yesterday’s geometry.
The panel lessons redrew one panel at a time: Edit Main Panel → OK, and the drawing regenerated
from its stored data. That is fine for one panel. But a real project carries dozens of panels, and a
single change often ripples across many of them — a project detail everyone shares, an origin panel
whose linked copies fell behind, or simply a folder of drawings that were last drawn on an older
build. Opening each one to redraw it by hand does not scale. Batch Utilities is the hub that
does it for you: its Update Drawings operation walks a scope of panels, regenerates each from
the model stored inside its own .dwg, saves it, and moves to the next — hands off the keyboard.
This lesson is a guided first pass; the full field notes on Batch Utilities live in
Print a panel book.
Note
This lesson is AutoCAD-only. ConstructiVision on the web has no equivalent today — the browser page for this lesson explains why, so you are not left hunting for a feature that is not there.
Watch this lesson
Transcript (12 captions)
0:01 — Tutorial 21 — Auto Drawing Update. The panel lessons redrew one panel at a time: Edit Main Panel, OK, and the drawing regenerated from its stored data. Batch Utilities does that across a whole scope in one pass — so no affected sheet is left showing yesterday's geometry.
0:17 — Step 1 — with the project open, CV → Batch Utilities. Three columns across the top — operations on the left, sort in the middle, the project's panel list on the right — and the printing options below.
0:19 — If any linked panels are out of sync with their source, Batch Utilities warns you first and lists them — but lets the batch proceed. That warning is a safety net, not a stop: the Update Drawings pass is exactly what brings them current.
0:34 — Step 2 — read the panel list. Select Panels on the right is the project's panel folder, one row per drawing, each showing Panel# / Date / Time — the last-saved timestamp. It is the same set the Linked Panels dialog shows; both read the project through one shared enumeration.
0:51 — Sort Panels by: Date Modified — it floats the most-recently-touched drawings to view, so you can eyeball which panels have moved. Panel Number, Reverse Number, and Reverse Date are the other orderings.
0:53 — Step 3 — choose the scope. Select All takes the whole project, the common choice when a shared change could have touched anything. Or Ctrl-click and Shift-click pick a subset; Clear All resets. Leaving nothing picked also means all panels — the batch treats 'nothing' as 'everything'.
0:54 — Step 4 — in Select Operation(s), tick Update Drawings. This is the operation that regenerates each panel from its stored data — the batch form of the single-panel redraw. It changes no panel's data; it only brings each drawing's geometry back in step with the data it already holds.
0:56 — Leave the print operations — Print Panel Book, Print Materials List, Print Revision History — unticked: this pass is a pure update, no plotting. The Printing Options band below shapes printed panel books, not an update-only pass, so leave it as it sits.
1:10 — Step 5 — the run. Clicking OK takes the selected panels in turn: it opens each panel drawing from the project folder, regenerates it from its stored data, saves it, and moves to the next. The batch runs sequentially and hands-off — you do not touch the keyboard while it works — and returns you to the editor when it finishes.
1:30 — Cancel for this walkthrough — the batch opens and saves every drawing in the scope, so we let it run on your own project, not on a demo stage. With Update Drawings ticked and your scope chosen, OK is the one-pass answer to the redraw you would otherwise run panel by panel.
1:42 — Step 6 — confirm the set is current. Reopen CV → Batch Utilities and sort by Date Modified: every panel the pass touched now carries a fresh timestamp — the batch saved each one as it redrew it. That single column is the proof the update reached the whole scope, no panel left showing an older time than the change that prompted the run.
2:04 — This lesson's result is the panel drawings on disk, not a single graded drawing — so there is no CV-CHECK-LESSON21. Update Drawings is the one-pass answer whenever one change could have moved more than one drawing: a shared detail, a linked origin's copies, or a folder of panels drawn on an older build, all brought current in a single sweep.
Tip
The written steps below are the authoritative version — they are kept current continuously, while videos are re-recorded in batches. Companion video versions lists which build each video was recorded against.
What you will build
From the finished TP08-12 project — the panel thread, ideally with the TP08-20 twin from Tutorial 14: Linked Panels alongside it:
a single Batch Utilities pass that regenerates every selected panel from its stored data, leaving the drawings on disk current and saved;
a working feel for the Select Operation(s) hub — how Update Drawings differs from the print operations, and how the panel scope and sort controls pick exactly which sheets the pass touches;
the batch counterpart to the single-panel redraw you have run at the close of every lesson: one dialog, many panels, no per-panel clicks.
Before you start
The advanced track builds on the finished panel thread: complete the panel lessons through Tutorial 9: Brace Points & Expansion Gaps. This lesson is most instructive with more than one panel in the project — if you followed Tutorial 14: Linked Panels, the project already holds TP08-12 and TP08-20, a perfect two-panel scope.
A project must be open. Batch Utilities scans the open project’s folder for its panels; with no project open it stops and says “No project is open. Please create or open a project first.”
The panels must have been saved at least once — the batch reads each drawing from disk, opens it, and redraws it. If you have followed the thread, every lesson’s closing redraw has saved already.
Tip
Joining here? Download the lesson solution — the finished TP08-12 — and place it in the project
folder you created in Tutorial 1 before opening it. Batch Utilities works on the project’s panel
folder and opens each drawing from there, so this lesson wants the panels inside their project — not
opened from a downloads folder. To exercise a multi-panel scope, run Tutorial 14: Linked Panels first
so TP08-20 sits beside TP08-12.
Lesson
Step 1 — Open Batch Utilities
With the project open, choose CV → Batch Utilities. The ConstructiVision - Batch Utilities dialog opens with three columns across the top and the printing options below.
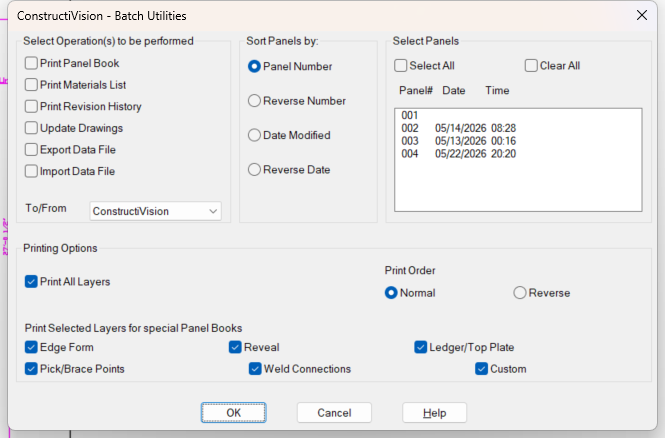
The Batch Utilities dialog — operations on the left, sort in the middle, the project’s panel list on the right.
If any linked panels are out of sync with their source, Batch Utilities warns you first — listing the stale panels — but lets the batch proceed. That warning is a safety net, not a stop; the Update Drawings pass you are about to run is exactly what brings them current.
Step 2 — Read the panel list
The Select Panels list on the right is the project’s panel folder, one row per panel drawing, each showing Panel# / Date / Time — the drawing’s last-saved timestamp. This is the same list the Linked Panels dialog shows; both read the project through one shared enumeration, so what you see here is the authoritative set of panels the project owns.
Under Sort Panels by: pick how the list orders itself — Panel Number, Reverse Number, Date Modified, or Reverse Date. Date Modified is the useful one here: it floats the most-recently-touched drawings to view so you can eyeball which panels have moved.
Step 3 — Choose the scope
Decide which panels the pass will redraw:
Click Select All to take the whole project — the common choice when a shared change could have touched anything. (Leaving the list with no selection also means all panels — the batch treats “nothing picked” as “everything.”)
Or click individual rows to pick a subset — multi-select is on, so
Ctrl-click adds panels andShift-click takes a range. Clear All resets the selection.
For this lesson, click Select All — TP08-12 and TP08-20 both light up.
Step 4 — Tick Update Drawings
In the Select Operation(s) to be performed column on the left, tick Update Drawings.
This is the operation that regenerates each panel drawing from its stored data — the batch form of the single-panel redraw. Leave the print operations — Print Panel Book, Print Materials List, Print Revision History — unticked: this pass is a pure update, no plotting. (Ticking a print operation as well runs both in the one pass, per Tutorial 13: Materials List & the Panel Book; here you want update alone.)
Note
Update Drawings is a redraw, not an edit. Each panel is regenerated from the model already
stored inside its own .dwg — the same read-the-model-then-draw path a single Edit Main Panel →
OK runs, just applied panel after panel. The batch changes no panel’s data; it only brings each
drawing’s geometry back in step with the data it already holds.
The Printing Options at the bottom — Print All Layers, Print Order, and the per-trade layer toggles (Edge Form, Feature Strip, Ledger/Top Plate, Pick/Brace Points, Weld Connections, Custom) — shape the printed panel books of Tutorial 13: Materials List & the Panel Book. They do not affect an update-only pass; leave them as they sit.
Step 5 — Run the pass
Click OK. Batch Utilities takes the selected panels in turn and, for each one:
opens the panel drawing from the project folder;
regenerates it from its stored data — the redraw you have watched close every lesson;
saves it; and
moves to the next panel.
The batch runs sequentially and hands-off — do not touch the keyboard or start another drawing job while it runs. Let it finish and return you to the drawing editor before doing anything else. With the two-panel scope it is over in a moment; on a full project it walks the whole set.
Step 6 — Confirm the set is current
Reopen CV → Batch Utilities and sort by Date Modified. Every panel the pass touched now carries a fresh timestamp — the batch saved each one as it redrew it. That single column is the proof the update reached the whole scope: no panel is left showing an older time than the change that prompted the run. Click Cancel to close without running anything.
Note
When to reach for this. Any time one change could have moved more than one drawing: a linked origin you edited and want every copy refreshed beyond the linked pair; a project-wide detail; or a folder of panels drawn on an older build that you want re-emitted on the current one. Update Drawings is the one-pass answer — the redraw you would otherwise run panel by panel.
Check your result
Tip
This lesson’s result is the panel drawings on disk, not a single graded drawing — the batch
touches a whole scope of files — so there is no CV-CHECK-LESSON21 command. The single-drawing
lesson checker has nothing it could grade across a batch. Check the outcomes themselves against the
list below.
You should now be able to verify all of the following:
Batch Utilities opened on the project and its Select Panels list showed every panel drawing in the project folder, with Panel# / Date / Time columns — the same set the Linked Panels dialog lists.
Update Drawings was ticked and the print operations were left off — the pass redrew without plotting.
The batch ran sequentially and unattended, opening, redrawing, and saving each selected panel in turn, then returned you to the editor.
Reopening the dialog and sorting by Date Modified shows a fresh save timestamp on every panel the pass touched — the whole selected scope is current.
Opening any updated panel (Open Drawing) shows the drawing intact — its features, dimensions, and title block unchanged in content, redrawn from the same stored data.
If a panel you expected in the list is missing, it is not in the project folder — attach or copy it into the project first; the batch only sees the project’s own panels. If a linked panel still reads stale afterward, drive its update from the origin instead — see Tutorial 14: Linked Panels.
Where next
Reference depth: Print a panel book — Batch Utilities in full, including the print operations and the per-trade layer panel books.
The single-panel counterpart: Tutorial 13: Materials List & the Panel Book — the same hub used to batch-print the panel book, one update-then-print pass across the selection.
Driving updates from one origin: Tutorial 14: Linked Panels — when the change lives in a panel whose copies should follow automatically on save, rather than a manual batch sweep.