Tutorial 6: Standard Opening
Cut two window openings into your panel and watch ConstructiVision dimension and mark them automatically.
A standard opening is a rectangular void through the panel — a window or a generic opening. It is the workhorse feature of panel detailing, and its dialog introduces the row-per-feature grid that several later features (weld connections, pick points) also use: one row per opening, each configured independently, all cut and dimensioned on a single redraw.
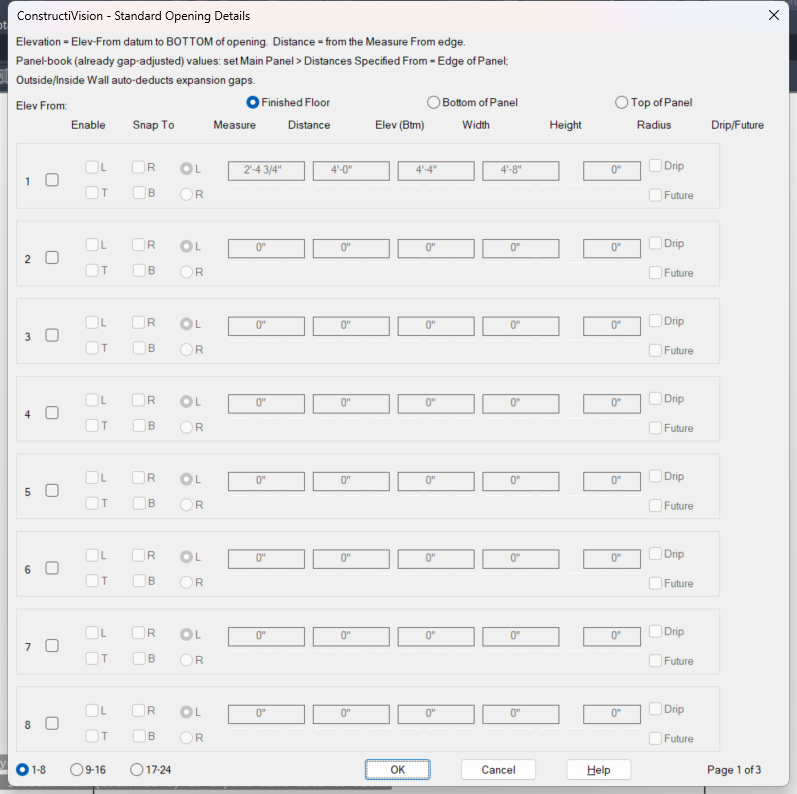
The Standard Opening Details dialog — one row per opening, eight rows per page.
Note
This lesson also exists in the browser. Work it in ConstructiVision on the web — same steps, same values, so you can follow either and end up with the same panel.
Watch this lesson
Transcript (21 captions)
0:01 — Tutorial 6 — Standard Opening. Two 6'-0" × 4'-0" windows, sills 4'-0" above Finished Floor: one 8'-6" from the left edge, one 4'-0" from the right.
0:10 — Click Standard Opening on the toolbar — or check it in Main Panel Details. Either route opens the same dialog.
0:12 — One row per opening: Enable, Snap To, Measure, Distance, Elev (Btm), Width, Height, Radius, Drip/Future. Elevation is to the BOTTOM of the opening; Distance is from the Measure-From edge to its nearest edge.
0:23 — Enable row 1 first — the fields stay greyed until it's checked.
0:24 — The left window. Measure From L — the distance is taken from the left panel edge.
0:26 — Distance 8'6 — the Lesson 5 door ends 7'-0" from the left edge, so 8'-6" leaves 1'-6" of solid concrete between door and window.
0:30 — Elev (Btm) 4'0 — Finished Floor to the sill.
0:34 — Width 6'0.
0:38 — Height 4'0 — sill at 4'-0", head at 8'-0" above Finished Floor.
0:42 — Radius stays 0 — a value here arches the top of the opening. Leave Drip and Future unchecked.
0:48 — The right window, row 2. Check Enable.
0:49 — Measure From R — 4'-0" in from its own end of the panel, read exactly as the plans draw it.
0:51 — Distance 4'0.
0:55 — Same sill — Elev (Btm) 4'0.
0:59 — Width 6'0.
1:03 — Height 4'0 — the same window, measured from the other end.
1:07 — The Elev From lens: switch to Bottom of Panel and both sills re-display as 5'-6" — the panel bottom sits 1'-6" below FF. The stored data never changes.
1:11 — Switch back to Finished Floor — the fields read 4'-0" again.
1:15 — OK — the Standard Opening checklist toggle switches on automatically and both windows are cut on a single redraw.
1:27 — Both windows cut clear of the door, tied into the dimension string, sill and head elevation markers set — and the Lesson 4 chamfer already on every opening edge.
1:33 — Flagging a row Future draws a dashed FUTURE OPENING instead of cutting concrete — try it and put it back. Then check your work: type CV-CHECK-LESSON6 for a graded report card.
Tip
The written steps below are the authoritative version — they are kept current continuously, while videos are re-recorded in batches. Companion video versions lists which build each video was recorded against.
Recorded in the earlier lesson order
This video was recorded before the course moved to build order (2026-10-09). In it the man door from Tutorial 5 is already on the panel and the openings arrive chamfered from Tutorial 4. In build order the windows come first, and the door and the chamfer follow in Tutorials 5 and 4.
What you will build
You continue with panel TP08-12 from Tutorial 2 — the gable-end panel with its bottom 1’-6” below Finished Floor, typed at 25’-10” and cast at 25’-9” with its 1/2” expansion gaps. In this lesson you cut two 6’-0” wide × 4’-0” tall window openings, sills at 4’-0” above Finished Floor — one 8’-6” in from the left edge, leaving room for the man door Tutorial 5 places between it and that edge, and one 4’-0” in from the right edge. When you finish, both windows are cut through the panel, tied into the horizontal dimension string, and marked with their sill and head elevations. Their edges are chamfered later, in Tutorial 4.
Before you start
Complete Tutorial 2: Panel Options — this lesson picks up the project and panel TP08-12 where that lesson left them.
Have panel TP08-12 open. Any panel works — the values below are what make the result checkable.
Lesson
Open Standard Opening Details. Click Standard Opening on the toolbar, or check Standard Opening in the Main Panel Details feature checklist — either route opens the same Standard Opening Details dialog.
Read the grid. Each row is one opening, with columns Enable, Snap To (L / R / T / B), Measure (from the Left or Right panel edge), Distance, Elev (Btm), Width, Height, Radius, and the Drip / Future toggles. Eight rows show at a time; the 1-8 / 9-16 / 17-24 buttons at the bottom page through all 24 openings a panel can carry. Two conventions, restated in the note across the top of the dialog:
Elevation is measured to the bottom of the opening (the sill), from the current Elev From datum — Finished Floor by default. The height then extends upward.
Distance is measured from the “Measure From” panel edge to the opening’s nearest edge.
Enable row 1 first. A row’s fields stay greyed out until its Enable box is checked — check Enable on row 1, then type. This is also the master switch per opening: unchecking it later keeps the values but leaves the opening out of the drawing, which is handy for design changes.
Enter the first window (the left one) on row 1:
Measure From: L — the distance is taken from the left panel edge.
Distance:
8'6— this leaves room for the man door you place in Tutorial 5: its jamb sits 4’-0” from the left edge and it is 3’-0” wide, so it ends 7’-0” from the edge, and 8’-6” leaves 1’-6” of solid concrete between the door and the window.Elev (Btm):
4'0— Finished Floor to the sill.Width:
6'0Height:
4'0— sill at 4’-0”, head at 8’-0” above Finished Floor.Radius: leave at 0 — that is a square-top opening. A value here arches the top of the opening instead, so it is not for windows like these.
Drip is ticked by default on every row: untick it. These windows get no drip marker. Leave Future unchecked.
Type dimensions in whatever format you read them off the plans, just as in Lesson 2:
4'0,4'-0", or48(inches) all work. The three small sliders under each box nudge the value by feet, inches, and sixteenths if you prefer clicking to typing.Enter the second window (the right one) on row 2: check Enable, set Measure From to R, then Distance
4'0and the same size and sill — Elev (Btm)4'0, Width6'0, Height4'0. Nothing crowds the panel’s right end, so this distance can be as simple as the plans draw it — and measuring it from the right edge means it reads on the sheet exactly the way a detailer reads it off the plans: 4’-0” in from its own end of the panel.Note
Every value is clamped to the panel’s edges — an opening cannot fall outside the panel. And if an opening should touch an edge, don’t chase it with a zero distance: use the Snap To boxes. Snapping L or R registers the opening against that side edge (the Distance and Measure columns grey out — they are now derived); snapping T or B registers it against the top or bottom (the Elev column greys out). That is how an opening that belongs flush on an edge is registered cleanly. (Footing steps, top steps, and loading docks are not snapped openings — each has its own dialog, where you pick a Side, L or R, instead.)
Try the Elev From lens. At the top of the dialog, switch Elev From from Finished Floor to Bottom of Panel. Both Elev (Btm) fields re-display as
5'-6"— the same sills, now referenced to the panel bottom, which sits 1’-6” below Finished Floor on TP08-12. This is a display lens only: the stored data does not change, and you can enter values in whichever datum your plans use. Switch back to Finished Floor — the fields read 4’-0” again.Confirm. Click OK. The Standard Opening feature switches on automatically now that at least one opening is enabled, and the panel redraws with both windows cut through it — dimensioned and elevation-marked. They are not chamfered yet: Tutorial 4 chamfers every opening edge on the panel at once.
Flag a future opening — then put it back. Reopen Standard Opening Details and check Future on row 1, then click OK. The left window redraws with a dashed perimeter and the words FUTURE OPENING inside — the concrete is not removed, but the sheet shows the field crew exactly where the future cut goes. (The Drip toggle is the lighter sibling: it just adds a “Drip” marker at the top center of a real opening.) TP08-12’s windows are real, so reopen the dialog, uncheck Future, and click OK — the redraw rebuilds the panel from its stored data and the window is cut again as if nothing happened.
Check your result
Tip
Check your work automatically. Type CV-CHECK-LESSON6 at the command line —
ConstructiVision grades your panel against this lesson’s values and prints a report card, with a
pointer back to the step for anything that doesn’t match.
The drawing and dialogs should now show, matching your entries exactly:
Two 6’-0” × 4’-0” window openings cut through the panel — one entered 8’-6” in from the left edge, one 4’-0” in from the right edge, both sills 4’-0” above Finished Floor.
The horizontal dimension string picking up each window: the distance in from its measured edge and its 6’-0” width.
Elevation markers outside the nearest panel edge giving each window’s sill and head heights.
Main Panel Details (open Edit Main Panel) with the Standard Opening toggle checked in the feature checklist.
Standard Opening Details, reopened, holding both rows exactly as entered — Enables checked, row 1 measured from L, row 2 from R, and Future clear.
Note
Why the drawn distances read 1/2” short. Tutorial 2 set a 1/2” expansion gap on each edge, with Distances Specified From on Outside Wall, so the panel casts at 25’-9” and a distance measured to a panel edge is drawn from the cast edge: 1/2” less than the plan value you typed. The dialogs keep the plan values exactly as you entered them.
If a value is off, reopen the dialog, correct the row, and confirm — the panel redraws from the corrected values, the same dialog → confirm → redraw loop as every lesson so far.
Where next
Next lesson: Tutorial 5: Door — place the man door in the room this lesson left for it.
Reference depth: Add a standard opening — the quick task version of this lesson, including the
+(adjacent) andc(center) entry shortcuts for the distance field, and its neighbors Add a man door and Add an overhead / dock door.