Add weld connections
Place weld-plate embeds on a panel — singly, snapped to an edge, or in evenly spaced arrays.
Weld connections are embeds cast into the panel wall, typically used as attachment points for joists, ledgers, canopies, and panel-to-panel joints after lifting. ConstructiVision draws each one as a simple box showing its overall size, location, and placement — the fabricator’s detail drawings cover the rest. Connection types (sizes and marks) are defined once per project in a shared connection catalog; every panel then places connections by picking a type from that list.
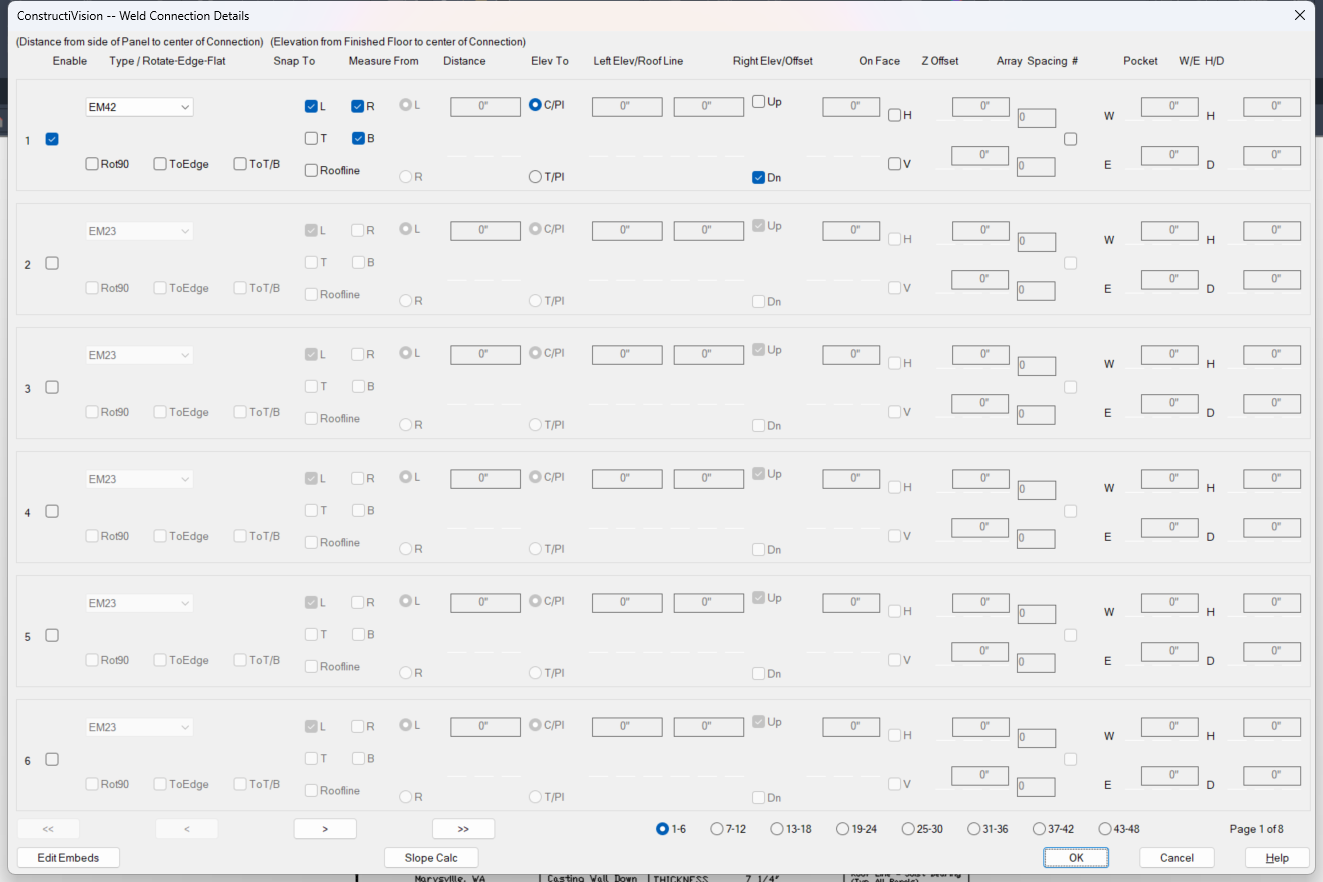
The Weld Connection Details dialog, shown with the sample building’s data.
Steps
Open Weld Connections for the panel — from the toolbar, or from the Main Panel Details feature checklist.
If the type you need is not in the drop-down list yet, choose Edit Embeds to open the Weld Connection Specifications editor — an 18-row-per-page table over the project catalog. Type the Type mark, Width, Height, and Thickness (plus optional Structural ID, Fabricator ID, and Description) into an empty row to add the type; edit a row in place to change it, and blank out its Type cell to delete it.
In a numbered connection row, check Enable and pick the Type from the drop-down list.
Position the connection:
Measure From — choose which panel edge (L or R) the distance is taken from.
Distance — from that edge to the center of the plate.
Elev To — whether elevations are entered to center of plate (C/Pl) or top of plate (T/Pl).
Left Elev — elevation from finished floor to the plate.
Or skip the measurements and use Snap To — L, R, T, or B snaps the connection flush to that panel edge and disables the corresponding entry fields.
Choose the face: Up, Dn, or neither (see Z Offset below).
For a row of connections, check H and/or V under Array and enter the center-to-center Spacing and quantity (#) for each direction.
Repeat for more connections — each page holds 6 rows, and the page buttons at the bottom step through all 48 slots.
Confirm with OK and redraw the panel. Each enabled connection is drawn, dimensioned, and marked with its type.
Row fields
Field |
What it does |
|---|---|
Enable |
Draws this connection. Unchecked rows keep their values but are not drawn. |
Type |
Connection type from the project catalog. Rot90 / ToEdge / ToT/B rotate the plate 90°, face it toward the nearest edge, or face it toward the top/bottom — combinable for any orientation. |
Snap To |
Snap the connection flush to the Left, Right, Top, or Bottom panel edge. Roofline makes the connection (or array) track the panel’s roof line instead of a fixed elevation. |
Measure From |
Which edge (L/R) the Distance is measured from; arrays sequence from this edge. |
Distance |
Edge to center of plate. For a horizontal array, the distance to the first plate. |
Elev To |
C/Pl or T/Pl — how elevations on your plans are called out. With T/Pl the plate is lowered by half its height; markers on the drawing always read to C/Pl. |
Left Elev / Roof Line |
Elevation from finished floor — to the plate, the lowest plate of a vertical array, or the string line at the left edge for horizontal arrays. |
Right Elev / Offset |
For sloped horizontal arrays, the string-line elevation at the right edge; with Roofline checked, the offset above or below the roof line. |
On Face |
Up / Dn place the connection on that panel surface, adjusting for intersecting recesses, pilasters, or lintels. |
Z Offset |
With neither face checked: distance from the down face to the center of the connection. Leave 0 to center it in the panel thickness — useful for corner and spandrel connections placed flat on an edge. |
Array |
H and/or V with Spacing (center to center) and quantity #. A quantity of 0 auto-fills the array across (or up) the panel without extending past it. |
Adds a joist / girder / chord pocket at the embed — Width, Height, Elevation of the pocket bottom relative to the top of the embed, and Depth. |
Notes
The catalog is project-wide. Every new project starts with a seeded starter catalog of common embed types. Only the type reference and placement are stored in each panel; the type definitions live with the project, so a change is instantly available to every panel. Panels already drawn do not update until redrawn — after editing a type, run Batch Utilities → Update Drawings to refresh them.
A red connection means its type is missing from the project catalog. If a panel references a type that has since been deleted from the catalog, the connection is redrawn as a red placeholder (using the panel’s most common type as a stand-in shape) and a WARNING: WC catalog mismatch note is added to the drawing listing the affected connections. ConstructiVision preserves the original type mark on the callout where it can. To fix it, re-create the type in Edit Embeds, then redraw.
Panel-to-panel connections: snap L and R at once for identical connections on both edges, or check both Up and Dn for identical connections on both faces at a square joint.
Sloped arrays get a string line on the final drawing to simplify embed placement. If the true spacing along the slope differs from the horizontal spacing by more than 1/16”, an extra baseline dimension is drawn parallel to the string line.
Roof-line tracking: draw roof lines first (open Roof Line from the toolbar), then check Roofline and enter the offset — the elevation of each plate is computed where it crosses the roof line. If an offset changes later, enter it once and push it to the other panels with a relative global change (an absolute change would make every panel’s array identical).
The
+entry shortcut places a connection at a set separation from the one in the row above: enter+followed by the spacing in the Distance or Left Elev field, and the remaining values are copied for you.The Slope Calc button opens the Slope Calculator for working out array elevations across a wall line.
The quantity of each connection type is included on the final drawing, and the Materials List totals connections by type for each panel.