Tutorial 1: Getting Started with ConstructiVision
Load ConstructiVision, create your first project, answer the Panel/Site prompt, and end with a saved starter panel.
This is the first lesson of the tutorial curriculum. It is a hands-on drill: you will type real values and end with a real, checkable result on disk. For installation and account-setup depth, keep Getting Started open beside this lesson — this tutorial assumes ConstructiVision is already installed.
Note
This lesson also exists in the browser. Work it in ConstructiVision on the web — same steps, same values, so you can follow either and end up with the same panel.
Watch this lesson
Transcript (26 captions)
0:01 — Tutorial 1 — Getting Started. From an empty drawing to a project on disk with its first panel: create, choose the drawing type, draw, save.
0:09 — Click New Project. The Project Details form opens — one form collects everything the project needs before any drawing exists.
0:12 — The top row stays at its defaults — Imperial, 1/8", English, 8 1/2 x 11. Only the Measurement System can never be changed after creation; everything else can.
0:21 — Concrete strength at time of lift: 4000 PSI — the form defaults to a conservative 2500. Concrete Weight stays 150 PCF.
0:25 — Project Name — Riverside Distribution Center. Building Name stays blank; it's only for multi-building projects.
0:32 — The job information, the way it should read on the drawings. Location —
0:39 — Contractor —
0:44 — Superintendent M. Alvarez — you can also add this later: Project Details reopens editable any time from the toolbar.
0:57 — City, State, ZIP — these flow into every panel's title block. Enter them once here, not on every sheet.
1:01 — Drawn By is already filled in from your login. That's the form.
1:06 — OK.
1:08 — A second, smaller dialog names the project folder. Type the project name —
1:16 — — and the folder path below picks it up automatically: the name is appended to the project root.
1:18 — The path is editable — put the project wherever it belongs. Avoid write-protected locations like Program Files; ConstructiVision warns you and asks again.
1:28 — OK — the folder is created and reported on the command line: the container for every panel drawing, the project data file, and the backups.
1:30 — What kind of drawing is this? Every ConstructiVision drawing is a Panel — one tilt-up panel and its shop sheet — or a Site: the building layout. Panel is the default.
1:41 — Panel.
1:45 — Main Panel Details — the panel's home form; Tutorial 2 covers it in full. For now, only the essentials. There is no height box — height comes from the elevations.
1:55 — Thickness 7 1/4.
1:59 — Width 25'10 — 25'10, 25'-10", or 310 all mean the same thing.
2:03 — Bottom Elevation -1'6 — the panel bottom sits 1'-6" below Finished Floor.
2:08 — Top Left 22'1 — watch it copy into Top Right: a flat top is one entry. 1'-6" below the floor plus 22'-1" above it makes the panel 23'-7" tall.
2:14 — Panel No. 1 — digits only; letters belong in the Prefix and Suffix fields beside it.
2:18 — OK — ConstructiVision draws the panel.
2:35 — A dimensioned 25'-10" by 23'-7" outline with its mark — Panel 1, ready for the features the later tutorials add.
2:51 — You never pressed Save — the panel saved into the project folder when it drew, and every redraw saves again with the previous version kept as a backup. Use AutoCAD's own Save to snapshot whenever you like.
Tip
The written steps below are the authoritative version — they are kept current continuously, while videos are re-recorded in batches. Companion video versions lists which build each video was recorded against.
What you will build
A new project named Riverside Distribution Center with its project folder on disk, and inside it one starter panel — Panel 1, a blank tilt-up panel 25’-10” wide x 23’-7” tall x 7 1/4” thick — drawn, dimensioned, and saved. You will also edit the project’s details after creation, so you have seen the full create → choose drawing type → draw → edit → save loop.
Before you start
ConstructiVision installed and a supported AutoCAD running — see Getting Started if you have not installed yet.
A writable location on disk for the project folder. Avoid write-protected locations such as
Program Files; ConstructiVision warns you and asks for a different directory if the folder cannot be created there.About 15 minutes.
No previous lesson is required — this is lesson 1.
Tip
Curious where this ends up? Download the
finished result to see where you’re headed
before you start.
Lesson
Step 1 — Load ConstructiVision
Start AutoCAD.
Confirm the CV menu appears in the menu bar and the ConstructiVision toolbar is visible. If the toolbar is missing, choose CV → Show CV Toolbar.
Every command in this lesson is available both as a toolbar button and on the CV menu — they open the same dialogs. See Command & Toolbar Reference for the full map.
Step 2 — Open the Project Details form
Click New Project. The Project Details form opens — this one form collects everything the project needs before any drawing exists.
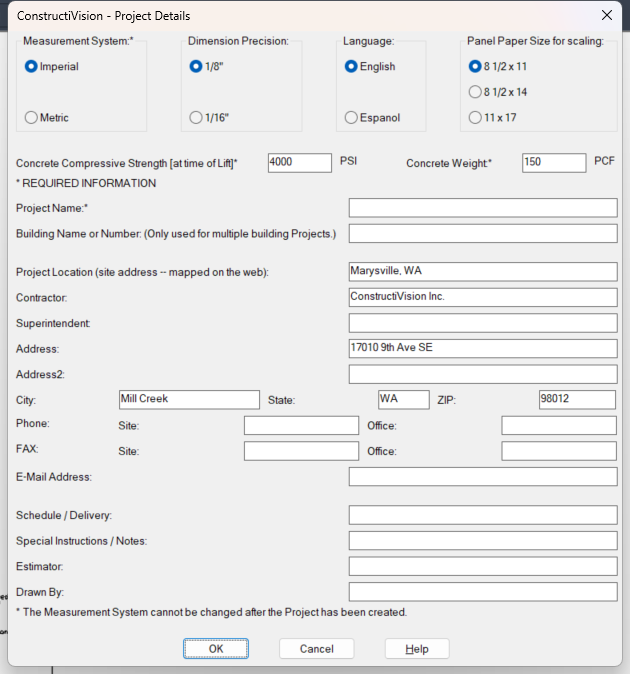
The Project Details form. Fields marked * are required.
Fill it in with these example values:
Measurement System — leave Imperial selected.
Warning
The measurement system cannot be changed after the project has been created — the form says so at the bottom. Everything else on this form can be edited later.
Dimension Precision — leave 1/8”. Pick 1/16” only when your shop details to sixteenths.
Language — leave English.
Panel Paper Size for scaling — leave 8 1/2 x 11. This is the sheet size your panel prints are scaled for.
Concrete Compressive Strength [at time of Lift] — type
4000PSI. This is the strength the panel must reach before it may be lifted; the form defaults to a conservative 2500.Concrete Weight — leave
150PCF (normal-weight concrete).Project Name — type
Riverside Distribution Center.Building Name or Number — leave blank; it is only used on multi-building projects.
Fill in the job information the way it should read on the drawings:
Project Location —
4870 Industrial PkwyContractor —
Summit ConcreteSuperintendent — leave blank for now; you will add it in Step 7.
City / State / ZIP —
Boise/ID/83705
Drawn By — notice it is already filled in with your login name. Correct it if needed.
Click OK.
These values become the defaults for every panel in the project and flow into each panel’s title block — enter them once here, not on every sheet.
Step 3 — Name the project folder
A second, smaller dialog opens asking for the name of your new project, with the name you just typed already filled in. Below it is the path where the project folder will be created — the project name is appended to it automatically.
Leave the name as
Riverside Distribution Center.Check the path. Edit it if you want the project somewhere else.
Click OK. ConstructiVision creates the folder and reports it on the command line:
Project created in: ....
The project folder is the container for everything in this building: every panel drawing, the project data file, and the backups ConstructiVision keeps as you work.
Step 4 — Answer the Panel/Site prompt
Next, ConstructiVision asks: What kind of drawing is this? — with two buttons, Panel and Site. Every ConstructiVision drawing is one or the other:
Panel — one tilt-up panel: its dimensions, openings, hardware, and shop-drawing sheet. This is where detailers spend most of their time.
Site — the building site: site plan, gridlines, wall and slab layout.
Panel is the highlighted default. Click Panel (or press Enter).
Step 5 — Draw the starter panel
Choosing Panel opens Main Panel Details — the panel’s home form. Tutorial 2 covers this dialog in full; for now enter only the essentials so the project contains a real panel. Note there is no single “height” box — a panel’s height comes from its elevations: bottom of panel up to top of panel.
Thickness — type
7 1/4.Width — type
25'10.Bottom Elevation — type
-1'6. The panel bottom sits 1’-6” below Finished Floor.Top Left Elevation — type
22'1. The value is copied into Top Right Elevation automatically, so a flat-top panel is one entry. 1’-6” below the floor plus 22’-1” above it makes the panel 23’-7” tall.Panel No. — type
1. The panel number is 1 to 4 digits; letters go in the optional Prefix/Suffix fields beside it.Click OK.
ConstructiVision draws the panel: a dimensioned 25’-10” x 23’-7” rectangular outline with its mark, ready for the features the later tutorials add.
If “Panel license required” appears instead of Main Panel Details
The first time you create or edit a panel on a signed-in seat, ConstructiVision claims one token from your organization’s balance and writes a permanent license into the drawing. If the balance is empty, Main Panel Details does not open, and you see:
Panel license required. Reason: insufficient_tokens Open cv-web -> Pricing to add tokens, or contact your org admin.
What it means: your organization has no tokens left. No panel is created and no token is spent.
What to do:
Click OK to close the message.
Add tokens in cv-web → Pricing at simplestruct.com, or ask your organization’s admin to.
Create the panel again. Main Panel Details opens, and from then on the drawing carries its own license. It is never charged again, and it prints free forever.
A different message, “License server unreachable”, means the seat could not reach the license service. Check your internet connection and try again. Every licensing message is listed in Membership & Tokens.
Step 6 — Understand how saving works
You did not lose work by not pressing Save — ConstructiVision saved the panel into the project folder automatically when it drew. Every time a panel draws, it is saved again, and the previous version is kept as a backup, so redrawing never destroys the drawing you had. The project data file is maintained in the project folder automatically as well.
Use AutoCAD’s own Save whenever you want to snapshot the drawing yourself — for example before closing AutoCAD.
Step 7 — Edit the project details
Project details are never locked in (except the measurement system). Add the superintendent you skipped earlier:
Click Project Details on the toolbar (or CV → Edit Project Details on the menu). The same form from Step 2 opens, pre-populated with everything you entered.
In Superintendent, type
M. Alvarez.Click OK. The change is saved to the project.
If you ever need to rename the project or move its folder, that is a separate command — Change Project Folder Location — not this form.
Check your result
Tip
Check your work automatically. Type CV-CHECK-LESSON1 at the command line while your
starter panel is open — ConstructiVision grades the project details and the panel against
this lesson’s values and prints a report card, with a pointer back to the step for anything
that doesn’t match.
You should now be able to verify all of the following:
The CV menu and ConstructiVision toolbar are present in AutoCAD.
On disk, a folder named
Riverside Distribution Centerexists at the location you chose in Step 3, and it contains the project data file and the panel drawing.The drawing shows a dimensioned rectangular panel outline — 25’-10” wide by 23’-7” tall — with its panel mark.
Reopening Project Details shows every value you entered, including
M. Alvarezas Superintendent,4000PSI, andSummit Concrete— nothing came back blank.
If a dialog did not open or a value did not stick, see Troubleshooting.
Where next
Tutorial 10: Site Drawing — the next lesson in build order lays out the site the panels will stand on: the grid, the wall lines and the slab. Then Tutorial 2: Panel Options opens Main Panel Details properly: master dimensions, marks and prefixes, expansion gaps, and the feature checklist. See the curriculum for the full lesson sequence.
Setup depth (install, pairing, first print): Getting Started
What every button does: Command & Toolbar Reference
Task-by-task reference for each feature: How-To Guides