Add a recess or blockout
Place a recess, blockout, or insulation block in a panel — rectangular, circular, arched, or triangular.
A blockout is a shaped void in the panel; a recess is the same shape at partial depth — used for rough openings, footing steps, beam pockets, pour-throughs, architectural recesses, and insulation blocks in sandwich panels. A panel can carry up to 30 of them, each configured on its own row of one dialog.
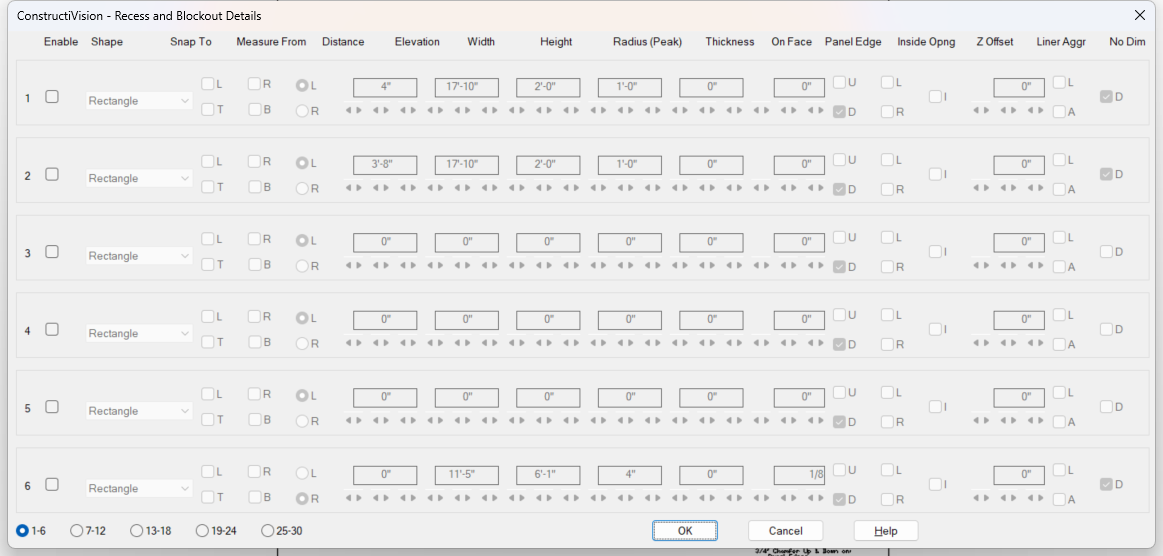
The Recess and Blockout Details dialog, shown with the sample building’s data.
Steps
Click Recess / Blockout on the toolbar with the panel’s drawing open.
The Recess and Blockout Details dialog shows six rows per page. Use the page buttons (1-6 through 25-30) to reach more rows.
Check Enable on a free row. The row’s fields light up.
Pick a Shape — Rectangle, Circle, Arch, or Triangle. The fields that don’t apply to the chosen shape grey out.
Set the size and position fields (see the table below). To register the blockout against a panel edge, use the Snap To checkboxes instead of typing an exact distance or elevation.
Add more rows if needed; each blockout is configured independently.
Confirm with OK. The feature is switched on for the panel automatically, and the panel redraws with every enabled blockout cut and dimensioned.
Fields
Field |
What it does |
|---|---|
Enable |
Turns the row on or off. An unchecked row is kept but not drawn — handy for template panels and design changes. |
Shape |
Rectangle, Circle, Arch, or Triangle. |
Snap To (L / R / T / B) |
Registers the blockout flush against the chosen panel edge(s) — left/right and/or top/bottom — without typing a distance or elevation. |
Measure From (L / R) |
Which side of the panel the Distance is measured from; the dimension is drawn from that side. |
Distance |
Distance from the chosen panel side to the nearest edge of the blockout (to the center for a circle). |
Elevation |
Height of the bottom of the blockout above finished floor. |
Width / Height |
Size of the blockout. |
Radius (Peak) |
Radius of a circle or arch. For a triangle, the distance from its left edge to its peak. |
Thickness |
Depth of the recess. 0 cuts a blockout clean through the panel. |
On Face (U / D) |
Which panel face — up (near) or down (far) — a partial-depth recess sits on. |
Panel Edge (L / R) |
Places the recess on the selected edge of the panel, following mitered sides and intersecting pilasters/lintels. |
Inside Opng (I) |
Places the recess on the inside edges of intersecting openings. |
Z Offset |
Offset of the recess from the selected face — this is how insulation blocks for sandwich panels are made. |
Liner Aggr (L / A) |
Assigns a form liner or exposed aggregate to the recess. It is hatched in the drawing and counted in the materials list. |
No Dim |
Suppresses all dimensioning for this blockout — useful when several blockouts, openings, and pilasters combine into one complex shape. |
Notes
Fields enable and disable to match your choices: a Circle takes its Width and Height from the Radius; an Arch takes its Height from the Radius; a Rectangle has no Radius. Snapping L or R replaces Distance and Measure From; snapping T or B replaces Elevation.
A through blockout (Thickness 0) has no face: On Face, Z Offset, and Liner/Aggr are disabled until you give the recess a thickness. Z Offset also needs a face (U or D) selected.
Each blockout is dimensioned from the nearest panel edge to its nearest edge, with an elevation marker from finished floor to its bottom — except where an edge snap makes the dimension redundant, or No Dim is checked.
A top plate that crosses a blockout is carried across (or trimmed at) the opening, and intersecting anchor bolts are removed. If you want the top plate to step down into the opening instead — a stepped-top panel — use a Standard Opening, not a blockout.
Liner and aggregate areas adjust the panel’s concrete volume and weight, so the materials list and engineering figures stay accurate.