Set panel marks and gridline marks
Control the panel’s mark — prefix, number, suffix — and label the gridlines the panel sits on.
The panel mark is the name a panel carries everywhere: in the mark bubble drawn on the sheet, in the revision history, and in the drawing’s file name. It is built from three fields — a free-text Prefix, the Panel No. itself, and a free-text Suffix — so TP08- + 12 reads TP08-12. Gridline marks add the site grid bubbles to the panel drawing: a labeled gridline beside either panel edge showing which grid intersection the panel is erected on. Both are set on the Main Panel Details dialog.
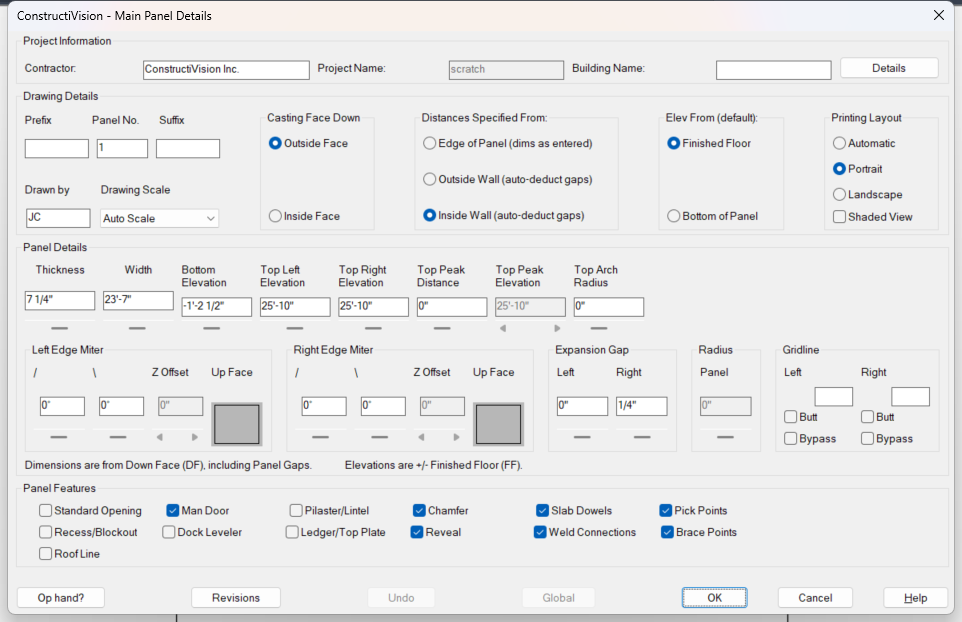
Panel mark prefix / number / suffix and the Gridline group live on the Main Panel Details dialog.
Steps
Open Edit Main Panel (the Main Panel Details dialog) for the panel.
In Drawing Details, set the mark:
Field
What it sets
Prefix
Free text placed before the number — a building, area, or project designation (e.g. TP08-). Leave it empty for a plain numeric mark.
Panel No.
The panel number — 1 to 4 digits, digits only. Letters are not accepted here; they belong in the Prefix / Suffix fields.
Suffix
Free text placed after the number (e.g. A for a panel added between two existing marks).
In Gridline, label the gridline at either side of the panel:
Field
What it sets
Left / Right
The grid label for that side of the panel (e.g. 12, 13) — the same designations as the site-plan grid bubbles. Leave a side empty to draw no gridline there.
Butt
Places that side’s gridline for a butt corner joint — offset further outside the panel edge than the plain gap position (see Notes).
Bypass
Places that side’s gridline for a bypass corner joint — inside the panel edge, at half the panel thickness.
Confirm with OK and let the panel redraw.
The mark bubble now shows the full mark — prefix, number, and suffix — and each labeled side gets a full-height gridline capped with a circled grid label, drawn at the same height and text size as the mark bubble so the two read together. A small callout under each grid bubble states the distance from the gridline to the panel edge.
Notes
The mark is stored in the drawing itself. Re-opening the panel shows the saved prefix and suffix, and the panel saves under its full mark — prefix TP08-, number 12 saves as TP08-12. An empty prefix and suffix give exactly the classic behavior: the mark is just the panel number.
Existing drawings are never silently renamed. A panel that predates the prefix/suffix fields and has never had a mark stored keeps its established file name when redrawn.
Duplicate numbers are caught. If a drawing with the entered number already exists in the project, ConstructiVision warns you and asks before overwriting it.
The project’s drawing names are separate from the mark prefix. Panel drawings created through the classic New Drawing flow are named from a short abbreviation of the project name plus the zero-padded panel number (e.g. TUT001). The mark Prefix / Suffix fields do not change that abbreviation — they change what the panel is called on the sheet.
Gridline placement. With neither toggle checked, the gridline sits outside the panel edge at that side’s expansion gap — the gap values entered on the same dialog. Butt moves it further out (twice the gap plus half the panel thickness); Bypass pulls it inside the edge by half the panel thickness and ignores the gap. Butt and Bypass are mutually exclusive per side — checking one clears the other.
Use Butt / Bypass at corners. At a square corner the two panels meet at one grid intersection, but only one of them can sit on the gridline — the other is offset by its neighbor’s thickness. Mark the panel that butts into its neighbor with Butt, and the panel that runs past the corner with Bypass.
Gridline marks live on their own layer, color-matched to the panel mark, so they can be shown, hidden, or printed separately. Redrawing the panel replaces the previous gridline marks — clearing both labels removes them.