Contents Menu Expand Light mode Dark mode Auto light/dark, in light mode Auto light/dark, in dark mode Skip to content
ConstructiVision Help
Logo
ConstructiVision Help
  • Getting Started
  • Tutorials
    • Tutorial 0: Signing In and Switching Users
    • Look it up by the word you actually use
    • Companion video versions
    • Tutorial 1: Getting Started with ConstructiVision
    • Tutorial 10: Site Drawing
    • Tutorial 2: Panel Options
    • Tutorial 6: Standard Opening
    • Tutorial 5: Door
    • Tutorial 4: Chamfer
    • Tutorial 7: Weld Connections
    • Tutorial 8: Ledger & Top Plate
    • Tutorial 3: Panel Lines
    • Tutorial 9: Brace Points & Expansion Gaps
    • Tutorial 11: Attach Panels
    • Tutorial 12: Construction Layout
    • Tutorial 13: Materials List & the Panel Book
    • Tutorial 14: Linked Panels
    • Tutorial 15: Revision Tracking
    • Tutorial 16: From CAD to cv-web
    • Tutorial 17: Full-height Radius (Curved) Panels
    • Tutorial 18: The Drawing Pipeline
    • Tutorial 19: The 3D Solid Model
    • Tutorial 20: Perimeter Inventory Layout
    • Tutorial 21: Auto Drawing Update
    • Tutorial 22: Interactive 3D Building & Panel Visualization
    • Tutorial 23: Building Elevations with Corner Intelligence
    • Tutorial 24: Plans & Sheets Model
    • Tutorial 25: AI Takeoff
    • Tutorial 26: Crane Pick & Brace Simulation
    • Tutorial 27: Monte-Carlo Pick-Sequence Analysis
    • Tutorial 28: Casting Orientation & Yard Layout
    • Tutorial 29: Feature Strips & Reveals
    • Tutorial 30: Blockouts Beyond the Rectangle
    • Tutorial 31: Openings That Are Not Rectangles
    • Tutorial 32: Reglets, Brick Ledges & the Masonry Interface
    • Tutorial 33: Bearing Seats & Embedded Angles
    • Tutorial 34: Parapets, Control Joints & Pour Strips
    • Tutorial 35: The Insert Family
    • Tutorial 36: Reinforcement & Panel Dowels
    • Tutorial 37: Bond Breaker & Panel Finish
    • Tutorial 38: Corbels, Haunches & Spandrel Seats
    • Tutorial 39: Dock Details — Leveler Pits & Door Guards
    • 100 — Panel Dimensions & Finished Floor
    • 101 — Chamfer, both routes
    • 102 — Slab Dowels
    • 103 — Recess & Blockout
    • 104 — Brace Points
    • 105 — Pilaster & Lintel
    • 106 — Ledger & Top Plate
    • 107 — Roof Line
    • 108 — Standard Opening
    • 109 — Weld Connections
    • 110 — Edge Miters
    • 111 — Panel Joint (Expansion Gap)
    • 112 — Top Profile: peak and arch
    • 113 — Pick Points
    • 114 — Feature Strips, horizontal and vertical
    • 115 — Dock Levelers
    • 116 — Beam Pocket
    • 117 — Pipe & Conduit Penetration
    • 118 — The Crane toolbar
    • 119 — Build-phase views
    • 120 — The Project Browser
    • 121 — The Tracker
    • 122 — Change Project Folder Location
    • 123 — Sandwich Panel
    • 124 — Top Step
    • 125 — Footing Step
    • 126 — Lintel Details
    • 127 — Exterior Face
    • 128 — Draw Site Plan
    • 129 — Construction Layout IN and OUT
    • 130 — Cast Layout Draw
    • 131 — Autosite
    • 132 — Pick Wall Lines
    • 133 — Interference Check and QA Findings
    • 134 — Views and layers
    • 135 — Print Setup and Print Select Layouts
    • 136 — Space Census
    • 137 — Up-Convert Panel
    • 138 — The Tutorial button
    • 139 — Color Theme
    • 140 — The Slope Calculator in AutoCAD
    • 141 — Your account in AutoCAD
    • 142 — Program Options in AutoCAD
    • 200 — Panel Dimensions & Finished Floor, in cv-web
    • 201 — Chamfer, in cv-web
    • 202 — Slab Dowels, in cv-web
    • 203 — Recess & Blockout, in cv-web
    • 204 — Brace Points, in cv-web
    • 205 — Pilaster & Lintel, in cv-web
    • 206 — Ledger & Top Plate, in cv-web
    • 207 — Roof Line, in cv-web
    • 208 — Reviewing a panel set against the corpus
    • 209 — Weld Connections, in cv-web
    • 210 — Rough openings, in cv-web
    • 211 — Windows (Standard Openings), in cv-web
    • 212 — Man doors, in cv-web
    • 213 — Dock levelers, in cv-web
    • 214 — Blockouts, rectangular and round
    • 215 — The top profile
    • 216 — Top steps
    • 217 — Footing shapes
    • 218 — Side slabs
    • 219 — Slope details
    • 220 — Panel attributes
    • 221 — Edge Miters, in cv-web
    • 222 — Panel Joint (Expansion Gap), in cv-web
    • 223 — Pick Points, in cv-web
    • 224 — Feature Strips, in cv-web
    • 300 — Site Setup, in cv-web
    • 301 — Place Panel, in cv-web
    • 302 — Site Layers, in cv-web
    • 303 — Cast Layout, in cv-web
    • 304 — Brace Plan, in cv-web
    • 305 — Crane, capacity and the pick simulation
    • 306 — Brace clash detection
    • 400 — Your account, membership and tokens
    • 401 — Exporting a project (.cvp)
    • 402 — Exporting a panel to DXF
    • 403 — Exporting the site plan to DXF
    • 404 — Importing a CV file
    • 405 — Importing a DXF
    • 406 — The engineering round trip
    • 407 — Issuing the panel book
    • 408 — The materials list
    • 409 — Drawing setup
    • 410 — Program Options: the whole panel in one place
    • 411 — Blueprint to shop drawing book
    • 412 — Revision notes
    • 413 — Project settings
    • 414 — Exporting a template (.cvt)
    • 415 — Batch utilities
    • 416 — The SE verification record
    • 417 — The slope calculator
    • 418 — Exporting one panel, or one site
    • 419 — Opening a project
    • 420 — Installing an update
  • How-To Guides
    • Design a project in the order it is built
    • Move or rename a project
    • Customize the color theme
    • Set panel marks and gridline marks
    • Add a standard opening
    • Add a man door
    • Add an overhead / dock door
    • Add a recess or blockout
    • Add a pilaster or lintel
    • Add a ledger and top plate
    • Add chamfers and reveals
    • Add pick points and brace points
    • Add weld connections
    • Work with linked panels
    • Use the Slope Calculator
    • Up-convert a legacy panel
    • Lay out the site
    • Plot and print drawings
    • Print a panel book
    • Track revisions
    • Generate a materials list
    • Export lift-engineering data
    • Lifting and Rigging Details
      • 201 Crane Planning and Selection
      • 201 Rigging Hardware and Geometry
      • 201 Panel Lift, Set, and Brace Workflow
      • 301 Lift Engineering Calculations and Checks
      • 301 Brace Anchor Design and Verification
      • 301 Construction Sequencing, Risk, and Hold Points
  • Troubleshooting
  • Quick Reference
  • Command & Toolbar Reference
  • Release notes
  • Membership & Tokens
  • Using cv-web
    • Create your account
    • Work with cloud projects
    • Analyze panel sets
    • Track your learning
    • Share a panel book by link
    • Manage your billing
    • Pair your workstation
  • Reference & Knowledge Base
    • Project Glossary
  • Tilt-Up Design Details
    • Panel Feature Catalog — Tilt-Up Concrete Panels
    • Panel Joint Types — Tilt-Up Panels
    • Chamfers and Edge Profiles — Tilt-Up Panels
    • Corner Conditions — Tilt-Up Panels
    • Panel Proportions and Thickness — Tilt-Up Panels
    • Openings and Concrete Legs — Tilt-Up Panels
    • Panel Weight, Center of Gravity, and Material Quantities — Tilt-Up Panels
    • Lifting, Rigging, and Bracing — Tilt-Up Panels
    • Reinforcement, Cover, and Embeds — Tilt-Up Panels
    • Sealant Specifications — Tilt-Up Panel Joints
    • Panel Book Notation — Tilt-Up Design Details
    • Building Layout and Viewing Conventions
    • Industry References — Tilt-Up Design
  • Legal
    • Privacy Policy
    • Sub-processors
    • Data Processing Agreement (Template)
Back to top

Print a panel book

Batch-print a dimensioned drawing set for the project’s panels.

A panel book is the printable drawing package for a project’s panels — each panel drawn to scale, ready to issue. Panel books are produced from Batch Utilities, which runs the selected operation across many panels at once.
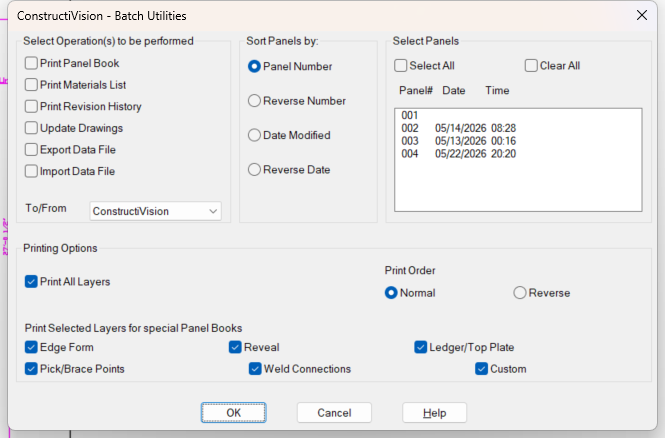
Batch Utilities dialog

The Batch Utilities dialog with the project’s panel list.

Steps

  1. From the CV menu, open Batch Utilities.

  2. In the panel list, select the panels to include. You can multi-select, and sort the list by Name or Date Modified.

  3. Choose the Print Panel Book operation.

  4. Run it. Each selected panel is opened, zoomed and centered to scale, and printed to your default AutoCAD printer, one after another.

Notes

  • Batch Utilities can also Print Revision History and Update Drawings (regenerate the panel drawings from their stored data) across the same selection.

  • To produce material quantities instead of drawings, see Generate a materials list.

  • The batch runs the panels sequentially; let it finish before starting another batch operation.

Related

  • Plot and print drawings — print a single drawing with the right layers on.

  • Generate a materials list

  • Export lift-engineering data

Next
Track revisions
Previous
Plot and print drawings
Copyright © 2026
Made with Sphinx and @pradyunsg's Furo
Last updated on Aug 08, 2026
On this page
  • Print a panel book
    • Steps
    • Notes
    • Related